
This section explains how to install and run QX82.
Setting up QX82
You can download QX82 from the GitHub repo.
QX82 is designed to have almost zero setup: it runs as-is if you simply check out the repository and put it into a folder. You will only need a way to spin up a local web server so you can open it in a browser. For example, if you have http-server, you can do:
    cd path/where/you/downloaded/qx82
    http-server -p 8000 -c -1
If you don't want to install http-server, you can use Python instead.
    cd path/where/you/downloaded/qx82
    python -m SimpleHTTPServer 8000
Or, if you have Python 3:
    cd path/where/you/downloaded/qx82
    python -m http.server 8000
With the local server running, point your browser to localhost:8000 and choose one of the example-*.html files to run it.
Write a Game
To start writing your own game, just copy one of the example HTML files and replace the code by your own code.
You can delete the other examples and unused stuff if you want to trim down your project folder to a minimum.
The only dependencies you need to keep are:
- qx82: (directory). That's the engine.
- assets/chr.png: That's your font and sprite sheet.
A Simple Example
For a very simple example, you can look at example-hello.html. Let's go over what it does.
It starts by importing the qx and qxa modules:
import * as qx from "./qx82/qx.js";
import * as qxa from "./qx82/qxa.js";
Then it defines a main function containing the core of the logic:
async function main() {
  ...
}
Then it initializes QX with qx.init():
window.addEventListener(
  "load", () => qx.init(main));
This tells QX to execute your main() function as soon as it's done initializing.
Now let's look at what the main() function does. Note the function is declared as async, meaning it can suspend its execution to wait for something to happen using Javascript's await keyword.
It starts by setting the foreground and background colors to, respectively, 7 (white) and 1 (blue) via qx.color(), then it clears the screen with qx.cls().
// Set fg and bg colors
// 7 = white, 1 = blue
qx.color(7, 1);
// Clear the screen
qx.cls();
This makes the whole screen blue. Now we're ready to start writing stuff to it. But where on the screen do we write? That's where the qx.locate() function comes it: it defines the cursor position, which is where text will be printed when we call qx.print().
 // Place the cursor at (1,1)
qx.locate(1, 1);
// Print something.
qx.print("Hi, what's your name?\n");
qx.print("Name: ");
Now we want the user to be able to type their name using their keyboard. For this, we can use the qxa.readLine(). Note that unlike qx.cls(), qx.print(), etc, qxa.readLine() is an asynchronous function (this is why it's in the qxa module rather than the qx module).
All asynchronous functions (all the functions in qxa.*) must be called with the await keyword:
 // Waits for the user to type a name.
 // Don't forget the 'await' keyword!
const name = await qxa.readLine();
Because this function is asynchronous, the program's execution will be suspended until the user finishes typing and presses ENTER.
Then the program continues, and you can do something with the name, like for example print it back.
// Print it back, but in yellow (14).
qx.color(14);
qx.print("Hello, " + name);
This was just an example showing the basics. I'm sure you can think of more exciting ways to use this engine!
Configuration
QX82 has a lot of parameters you can use to customize the display and behavior of the engine. You can see the options in the CONFIG object.
For example, you can change the screen's virtual resolution, enable/disable effects, change the color definitions, etc.
Text and Sprites
Like old-school machines, text and graphics are basically the same thing, and it all comes down to a bitmap font file:
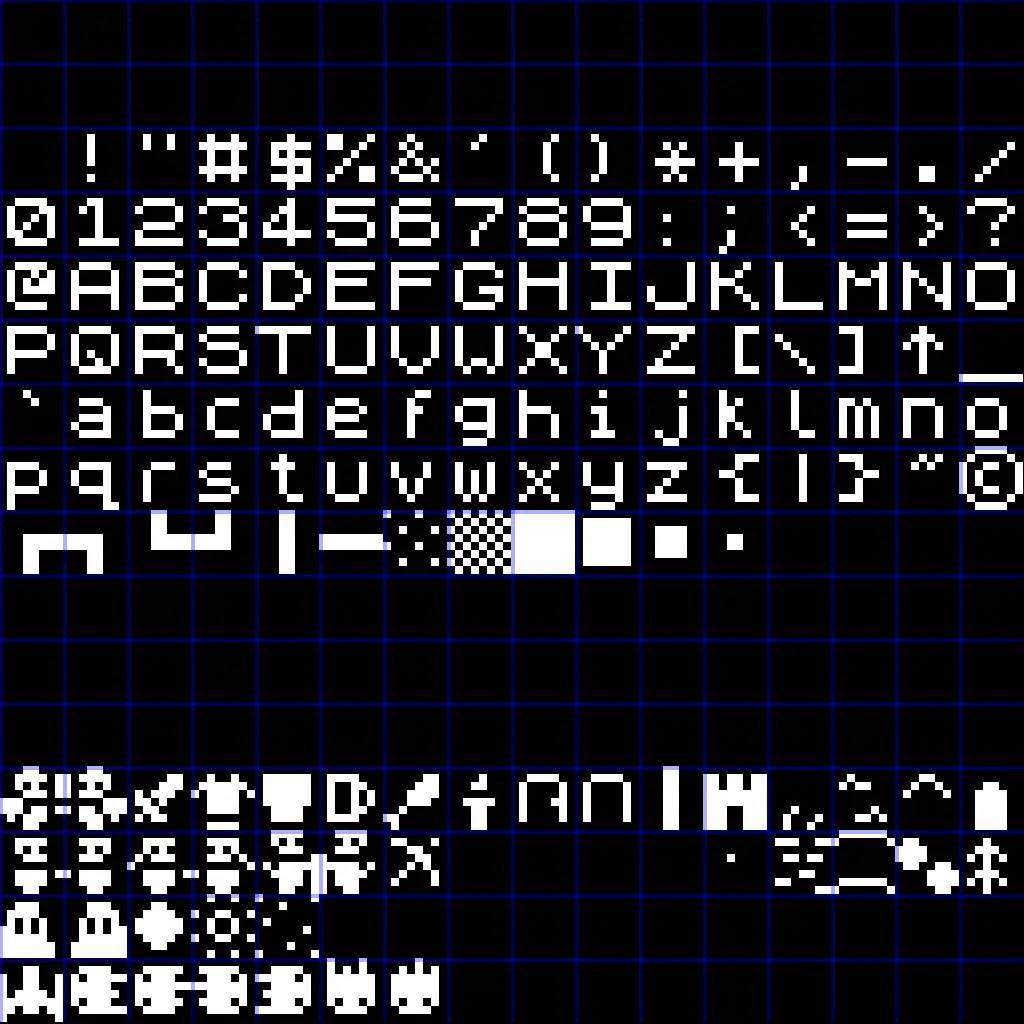
This file is located at assets/chr.png and you can obviouslly modify it however you want.
Each 8x8 cell in this file (note that the whole file is a grid of 16x16 such cells) is a character, corresponding to ASCII codes 0x00 to 0xFF. Since the file is 16 characters wide, you can easily think of the first hexadecimal digit as the row, and the second as the column, so character 0x41 is the "A" (row 4 counting from 0, column 1 counting from 0).
Some "characters" are indeed graphics like the hero and enemy graphics at the bottom and can be freely drawn via qx.print(), or qx.spr() as if they were text (well, they are text!).
Frame function
If you want to program an action game that keeps rendering continuously without blocking for user input, you can use the qx.frame() function to define a function that QX82 will call at 30 frames per second to redraw the screen and process input:
async function main() {
  ...
  // Set frame function (QX82 will
  // call it 30 times/second)
  qx.frame(doFrame);
  ...
}

function doFrame() {
  // Frame logic goes here
}
Check out the Spaceship Demo for an example of how to do that.
For a list of all functions available, see the Reference section.